Lemon Meringue Cake – Citron & Maräng Kaka

IMG_6113

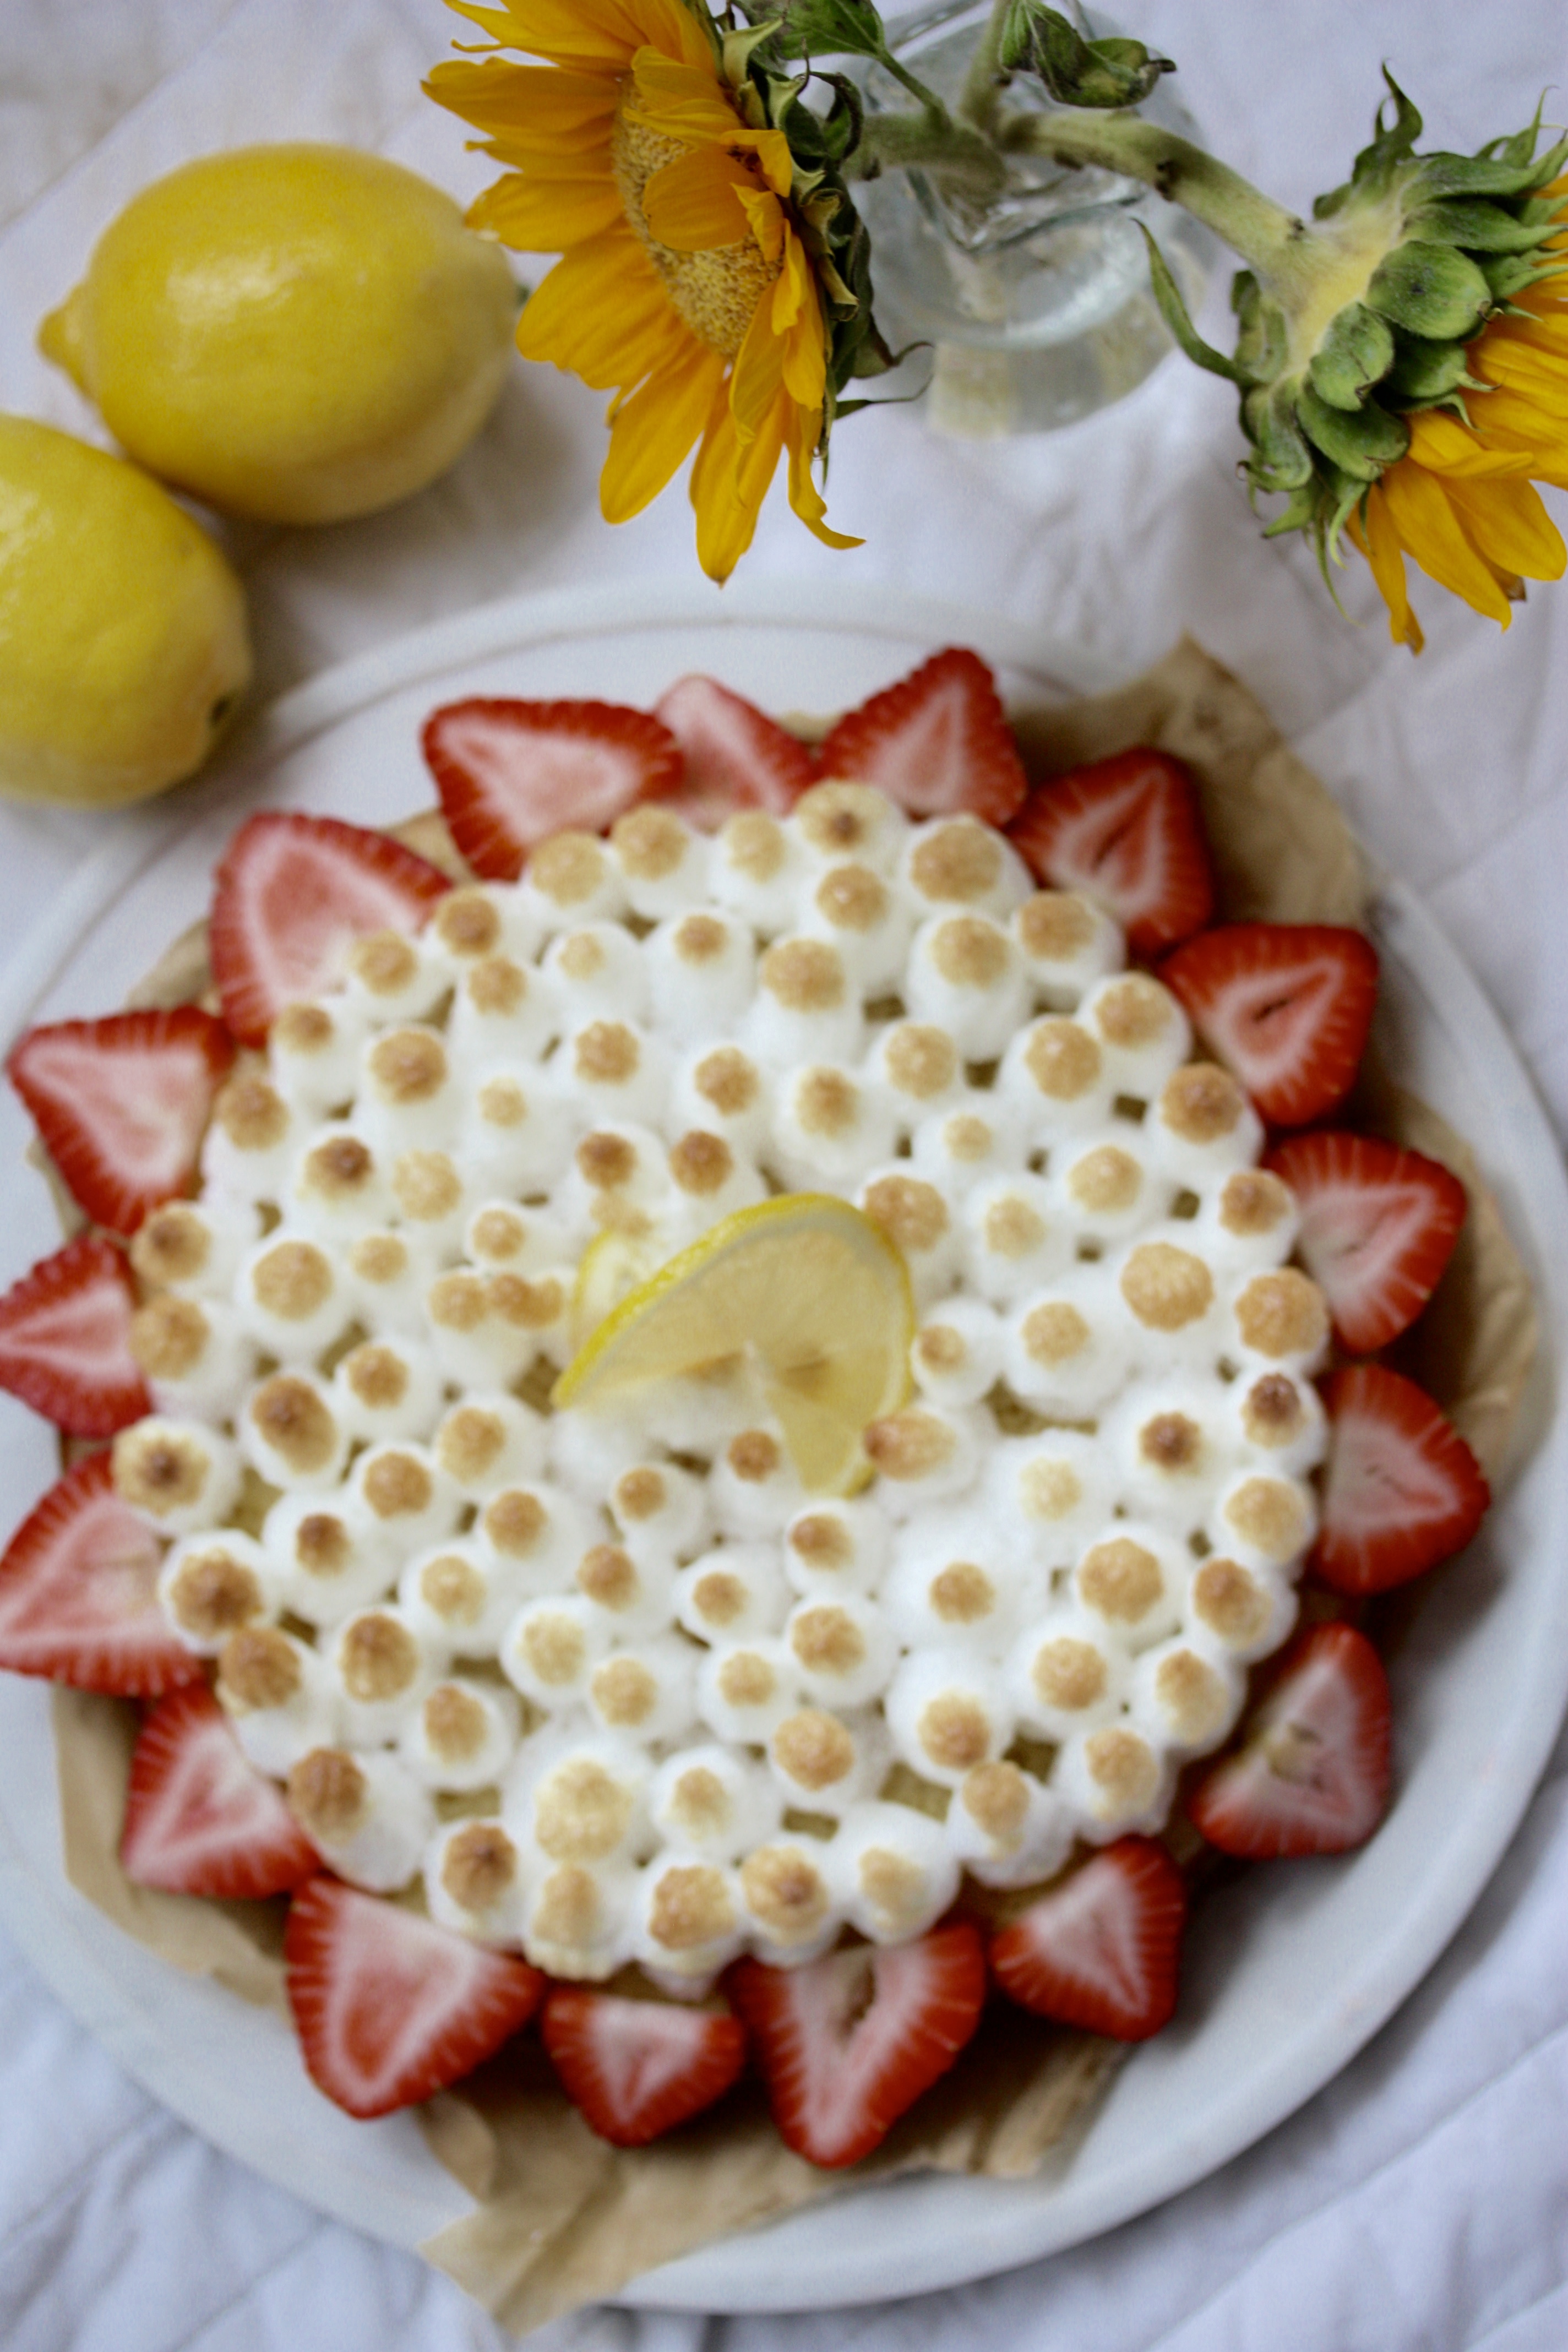
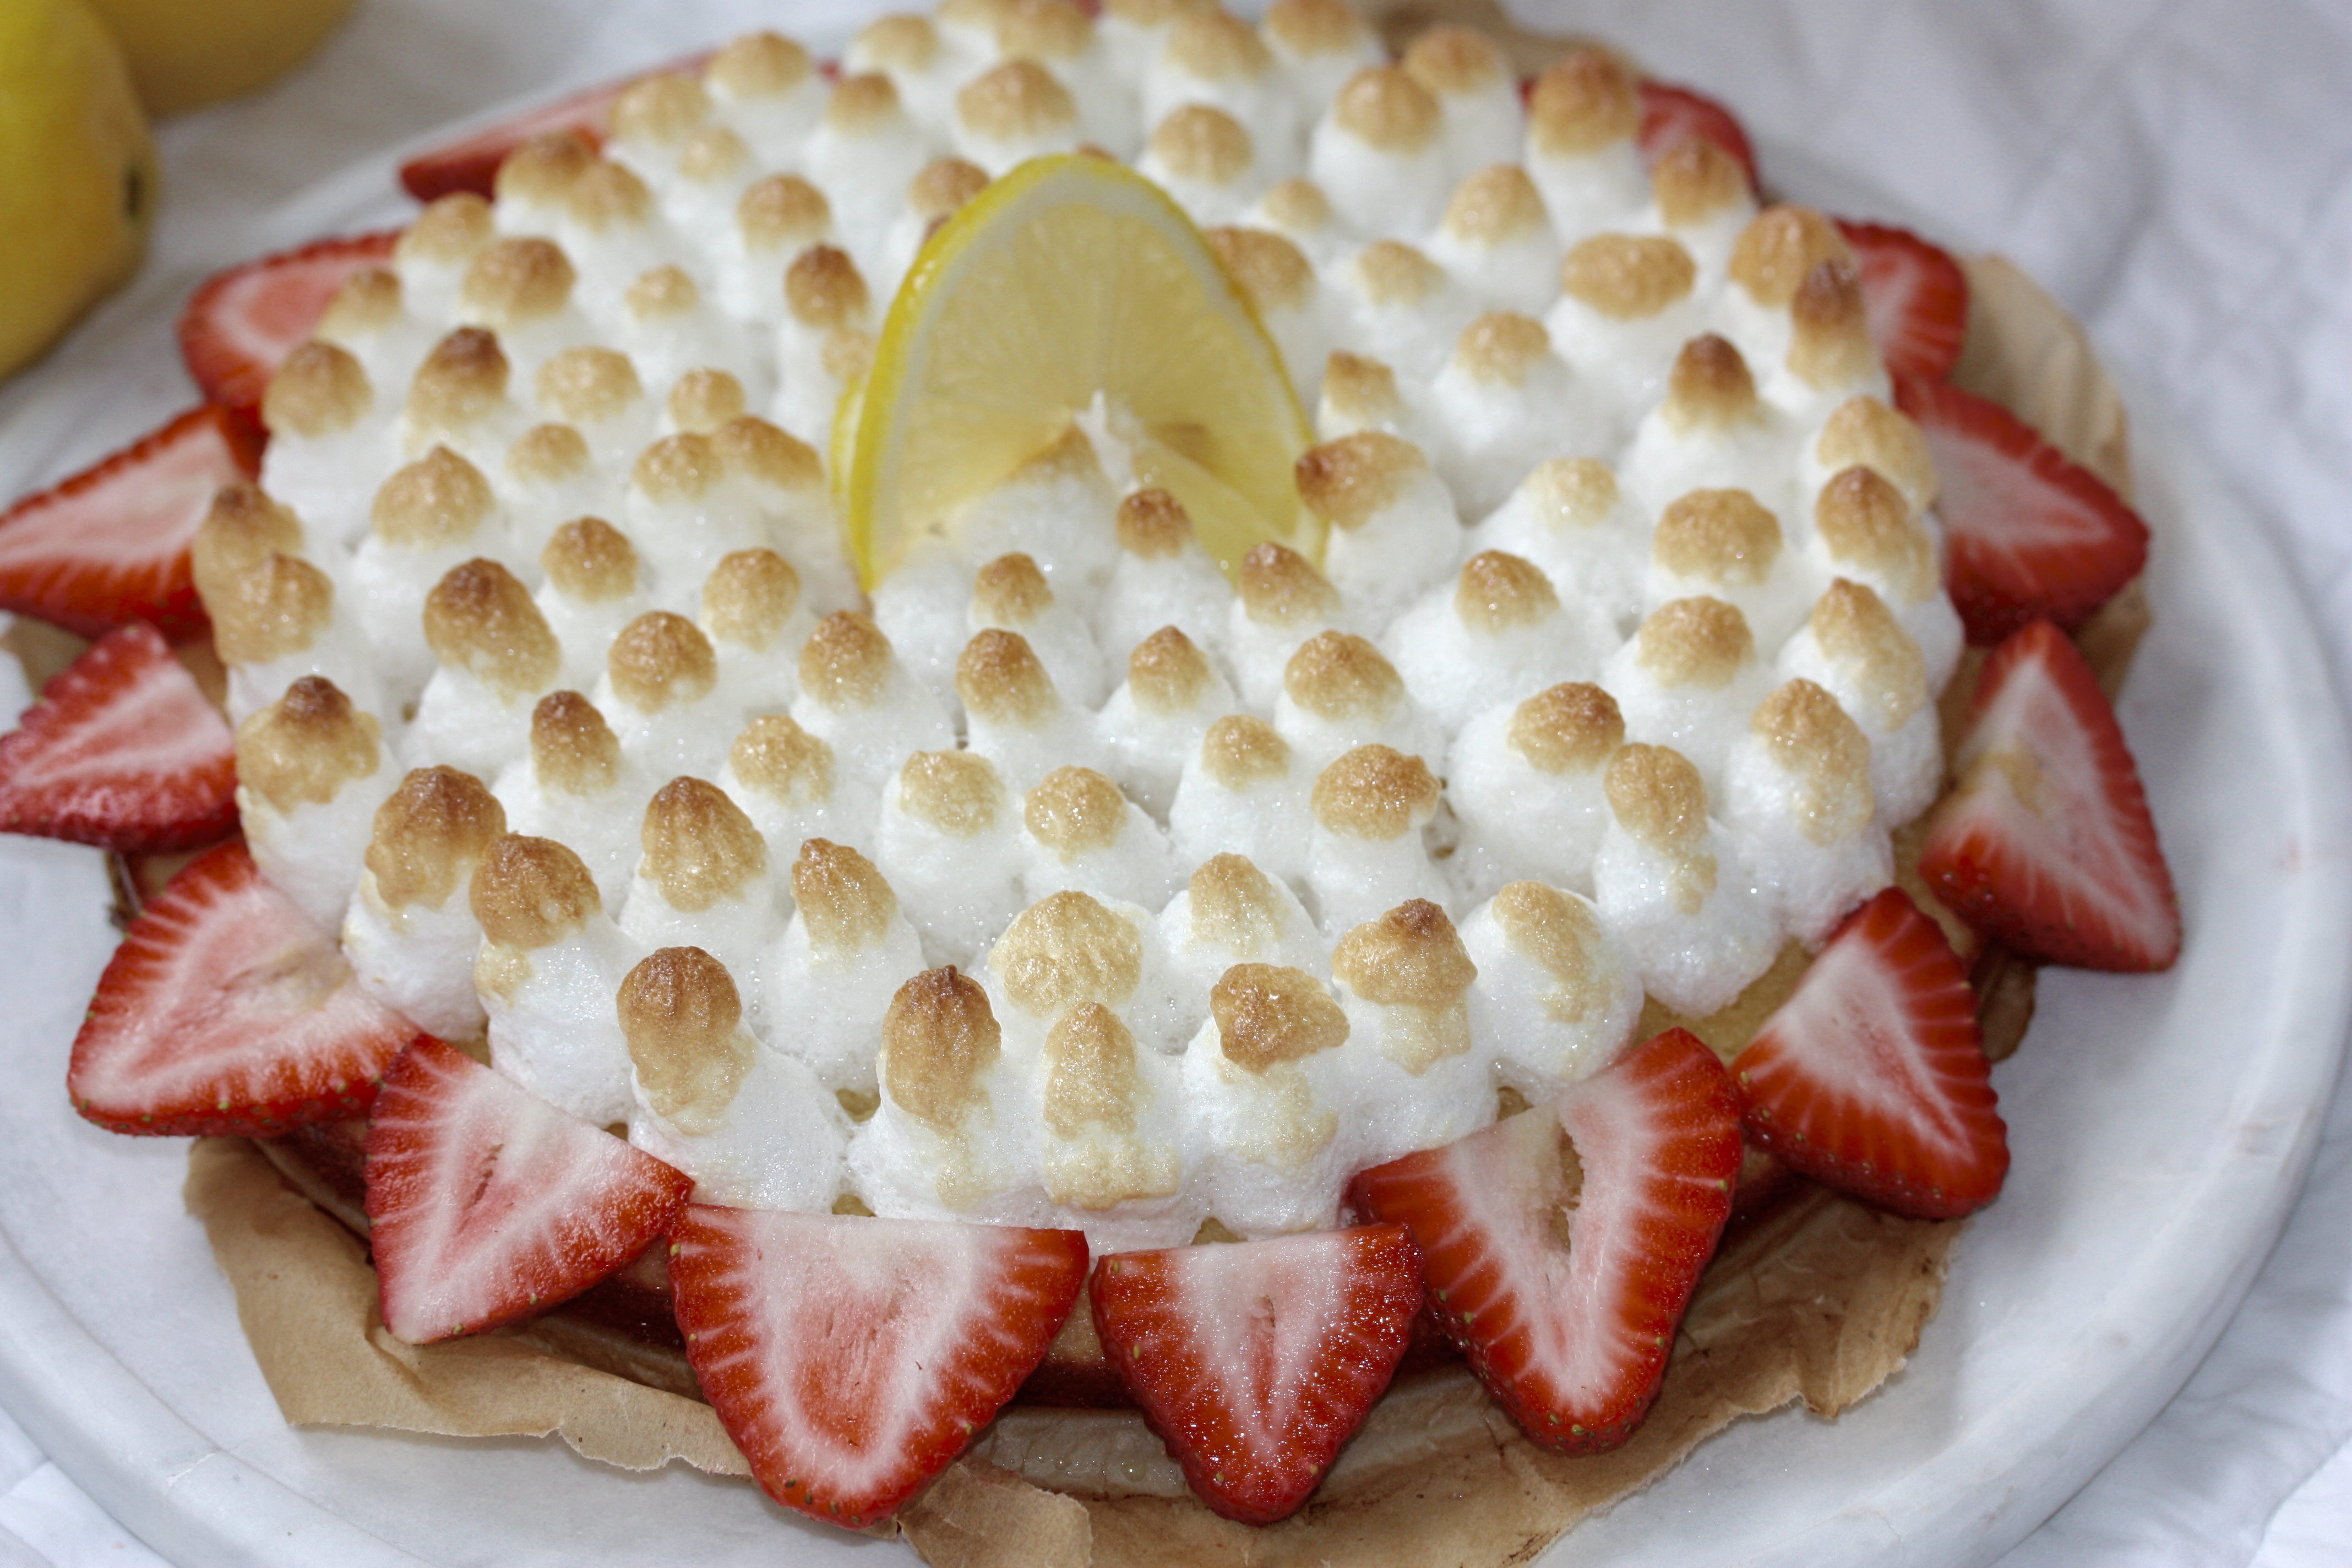
Lemon and meringue is an unbeatable combo. I am not sure if I’ve ever met anyone who actually doesn’t like lemon and meringue. I have made pies before, but (as some of you know) I am not a big fan of pies. I actually made this cake from a lemon-muffin recipe, baked it in a spring form and then, with help of an icing bag, applied the meringue and baked it again to cook the meringue slightly. Result turned out very pretty, and the cake is perfect for a summer day.

Recipe / Recept 

2 + 3 eggs / 2 + 3 ägg 

0.25 cups + 1 tbsp of sugar / 0,6 dl + 1 msk socker 

0,8 cups of flour / 2 dl mjöl 

50g of butter / 50 g smör 

0.5 tsp baking powder / 0.5 tsk bakpulver

1/2 lemon / 1/2 citron

a pinch of salt / en nypa salt 

a pinch of vanilla / en nypa vaniljsocker 

IMG_6109

1. Preheat the oven to 350F. / Sätt ugnen på 175 grader.

2. Whisk the 2 of the eggs together with sugar. / Vispa två av äggen tillsammans med socker.

3. Melt the butter and set aside. / Smält smöret och ställ åt sidan.

4. Mix in flour, salt, vanilla and baking powder. / Blanda i mjöl, salt vaniljsocker och bakpulver.

5. Stir in the butter. / Blanda i smöret.

6. Use all the zest from the lemon, plus half the juice and mix into the batter. / Använd allt skal från citronen och hälften av saften.

7. Mix into the batter and bake the cake for about 15-20 min in a round, greased pan. / Blanda i smeten och grädda i en rund, smörad form.

8. Meanwhile; separate the egg whites (3) from yolks. / Undertiden; separera äggvitor (3) från gulorna.

9. Whisk util a firm foam. / Vispa till ett hårt skum.

10. Whisk in 1 tbsp of sugar and a couple of lemon drops. / Vispa i socker och några droppar citronsaft.

11. When the cake is ready, take out of the oven and use a icing bag to pipe out the meringue. / När kakan är klar, använd en sprits och spritsa ut marängen.

12. Bake just until the meringue gets some color. / Grädda så att marängen får lite färg.

13. Done! / Klart!

IMG_6097IMG_6123

IMG_6101


Peanutbutter Chocolate Chip Cookies – Chocolate Chip cookies på Jordnötssmör

IMG_6014

These small cookies are both gluten and lactose free. The peanut butter binds the dough together, and make them very cake-y and gooey. I know there’s been a debate lately where buzzfeed tried recipes for the perfectly cake-y cookie, and realized that one of the things many people disregard is refrigerating the dough. Well, let’s just say that patience isn’t my greatest strengths in the kitchen. So, this recipe requires no chilling (even if chilling is ok as well) and is quick and easy. Cookies come out delicious every time! Try it right now! (For the peanut allergy friendly version, try this)

Recipe / Recept

1 cup of peanut butter / 2.5 dl jordnötssmör

1 egg / 1 ägg

0.5 cups of sugar / 1.25 dl socker 

1 tsp baking powder / 1 tsk bakpulver 

chocolate chips / chocolate chips

1.Preheat the oven to 350F. / Sätt ugnen på 175 grader.

2. Whisk together the peanut butter and egg on high speed. / Vispa ihop ägg och jordnötssmör snabbt med en elvisp.

3. Add sugar and baking powder. / Tillsätt socker och bakpulver.

4. Keep mixing until dough-y. / Fortsätt vispa tills det blivit en deg.

5. Fold in the chocolate chips. / Vik in chocolate chipsen.

6. Roll small balls and bake for about 6-8 min. / Rulla små bollar och grädda i ca 6-8 min.

7. Let cool. / Låt svalna.

8. Done! / Klart!

IMG_6022IMG_6029IMG_6038IMG_6035IMG_6026


Super Simple Gluten Free Strawberry Tarte

IMG_5971

Lots of snack hacks lately! I must admit that it’s been fun to find a different format of the blog, since after three years it can feel somewhat mundane to stay blogging the same way. Doing something different makes you realize and remember how fun and inspiring the blog actually can be (and that some people actually are reading it… 🙂 ). Spring has finally come to DC, and despite runny eyes and a lot of sneezing (and some claratin) it’s gorgeous out! Also, the times of somewhat mundane fruits and vegetables are coming to an end, and there’s finally AMAZING berries in the stores again. This strawberry tart is super easy to make, yet so beautiful and eye catching! In this recipe, I used whipped cream for the filling, but for a healthier version, you could switch it out for greek yogurt! Happy Baking!

Recipe / Recept 

Crust / Botten

1.5 cups of oat or almond flour / 3.75 dl havre eller mandelmjöl 

0.5 cups of coconut oil / 1.25 dl kokosolja 

1 tbsp of sugar / 1 msk socker 

a pinch of salt / en nypa salt 

1 egg / 1 ägg 

Filling / Fyllning 

1.2 cups of whipping cream / 3 dl grädde 

1 lemon / 1 citron 

1 lime / 1 lime 

powdered sugar after taste / florsocker efter smak 

strawberries / jordgubbar 

1.Preheat the oven to 350. / Sätt ugnen på 175 grader.

2. In a food processor, mix together all the ingredients for the crust. / I en mixer, blanda alla ingredienser till degen.

3. Push out in a spring form. / Tryck ut i en springform.

4. Bake for 12 min. / Grädda i 12 min.

5. Let cool. / Låt svalna.

6. Whisk the cream. / Vispa grädden.

7. Grate lemon and lime zest. / Riv citron och limeskal.

8. Mix in with the cream + a little juice. / Blanda i grädden + lite saft.

9. Add sugar to taste. / Blanda i socker efter smak.

10. Slice the strawberries. / Skiva jordgubbarna.

11. Spread one layer of cream on the crust, and add the strawberries around the edges, and continue building layers. / Bred ut grädde på pajbotten och lägg skivade jordgubbar i kanterna, fortsätt bygga upp pajen.

12. Done! / Klart!

IMG_5968IMG_5988IMG_6000IMG_5973

Repost: Mini Vacuum Cleaners (Traditional Swedish Pastry) – Mini Dammsugare

Today is the Vaccum Cleaner Pastry day in Sweden! So here comes my best recipe again!

IMG_4529

As strange as it might sound, these delicious small things are called vacuum cleaners in Swedish. It’s a traditional Swedish pastry, and it looks really cute. These were not hard to make, but, a little tricky and required some patients when it came to dipping the ends in chocolate. Other than that, they’re a no-bake treat (currently working with a broken oven). The traditional one’s are green, but the marsipan can be colored in any color you like. One important thing to notice is that the taste of these are very distinct, and not everyone likes them. Although, if you do, the combo of one of these and some coffee is hard to beat.

Recipe / Recept 

2 cups of sponge cake crumbles / 5 dl sockerkakssmulor

3.5 tbsp of soft butter / 50 g mjukt smör

2 large tbsp of cacao powder / 2 stora msk kako

a couple of drops of arrack essence or punch / några droppar arraksextrakt eller punsch

Marsipan / Marsipan

1 chocolate bar / 1 chokladkaka

1. Start by mixing butter, cake crumbs and arrack together. / Börja med att blanda smör, kaksmulor och arrakextrakt.

2. Mix in the cacao powder. / Blanda i kakaon.

3. Roll thin rolls of the dough. The thinner you roll the smaller the pastry. / Rulla tunna längder av degen, ju tunnare du rullar, ju mindre kan dammsugarna bli.

4. Put in the freezer. / Lägg i frysen.

5. Roll out the marsipan super thin. / Kavla ut marsipanen väldigt tunt.

6. Wrap the dough rolls in marsipan. / Rulla in degen i marsipan.

7. Cut in pieces. / Skär i bitar.

8. Put in the freezer again. / Lägg i frysen igen.

9. Melt the chocolate carefully by a water bath. / Smält chokladen med hjälp av ett vattenbad.

10. Dip the ends of the vacuum cleaners in chocolate. / Doppa ändarna i chokladen.

11. Let cool. / Låt svalna.

12. Keep in the fridge. / Förvaras i kylen.

13. Done! / Klart!

IMG_4506IMG_4509IMG_4514IMG_4555IMG_4559IMG_4521IMG_4527

Gluten Free Almond Flour Blondies – Glutenfria Mandelmjöls Blondies

IMG_5875

Ok, this is definitely one of the most delicious things I’ve eaten. I’ve never made blondies before because who doesn’t want all the chocolate one can have? Yet, I wanted to make something else than brownies and something else than chocolate, since I realize that is the most popular theme when it comes to baking here on the blog. So after some research I tried making these blondies, since it seemed to be the most popular recipe on -the internet-. I decreased the amount of brown sugar by accident, but they were still really sweet, and increased the amount of salt, because I love the sweet & salt flavor together. I also left out the white chocolate chips and the pecans, mostly because I didn’t have it at home. Although, THEY WERE SO SO GOOD. Honestly, they were very delicious. Although, I didn’t get the texture to become brownie like despite double time in the oven, so I would more so call it a blondie cake, nonetheless, you should make them too!

Recipe / Recept 

1/2 cup of butter / 110 g smör 

1/2 cups of brown sugar / 1.25 dl muscavado socker 

1/2 cup of white sugar / 1.25 dl vanligt socker 

2 eggs / 2 ägg

2 tsp of vanilla / 2 tsk vaniljsocker 

1 3/4 cups of almond flour  / 4.2 dl mandelmjöl 

1 tsp baking powder / 1 tsk bakpulver 

1 tsp salt / 1 tsk salt 

1 cups of chocolate chips / 2.5 dl chocolate chips 

1.Preheat the oven to 350. / Sätt ugnen på 175 grader.

2. Mix together butter and sugars until fluffy. / Vispa ihop socker och smör tills det är fluffigt.

3. Mix in the eggs. / Vispa i äggen.

4. Add all other ingredients except chocolate chips. / Blanda i alla andra ingredienser utan chocolate chips.

5. Fold in the chocolate chips. / Vik in chocolate chipsen.

6. Bake for 20-25 min (Mine took 45 min.). / Grädda i ca 20-25 min (mina tog 45 min).

7. Let cool. / Låt svalna.

8. Done! / Klart!

IMG_5891IMG_5881IMG_5903


Stove top Upside Down Apple Cake – Upp och Ner Äpple Kaka i Kastrull

IMG_5809

Yes, here comes another recipe from the inspiring facebook videos, but this time from tastemade. I thought it looked amazing to be able to cook a whole upside down cake in a pot on the stove, and clearly just had to try. The result? Well, if you’re eating the cake right away, it’s delicious! But if you’re saving it for later, it becomes dry. Not sure if it was my technique / heat being too high, or if this is a result of the stove top cooking, nonetheless, it’s easy & quick to make!

Recipe / Recept

1 apple / 1 äpple

2/3 cups sugar / 1,8 dl socker 

2 eggs / 2 ägg

1/4 cup of sugar / 0,6 dl socker 

1/3 cup of butter / 75 g smör

1 tsp vanilla / 1 tsk vaniljsocker 

2 tbsp cinnamon / 2 msk kanel

1 tbsp of brandy / 1 msk konjak

2/3 cups of flour / 1,8 dl mjöl

1/5 cup of almond flour / 0,5 dl mandelmjöl 

1/2 tsp baking powder / 0,5 tsk bakpulver 

yogurt / yoghurt 

1.Start by cutting the apples in small cubes. / Börja med att skära äpplet i små fyrkanter.

2.Heat up the 1/5 cups of sugar in a pot. / Värm upp 1 dl socker i en tjockbottnad kastrull.

3. When it starts to brown, add in 2 tbsp of water + apples. / När det börjar bli brunt, lägg i 2 msk vatten + äpplen.

4. Set aside. / Ställ åt sidan.

5. Mix together eggs + 1/4 cup of sugar. / Blanda samman ägg och 0,6 dl socker, vispa.

6. Add in the flour, baking powder, cinnamon, vanilla and brandy. / Blanda i mjölet, bakpulvret, kanel, vaniljsocker och konjak.

7. Melt the butter and mix in. / Smält smöret och blanda i.

9. Pour the batter over the apples, and cook on low heat with a lid i ca 10 min. / Bred på smeten over äpplena och grädda på låg värme under lock i ca 10 min.

10. Let cool for about 5 min. / Låt svalna ca 5 min.

11. Flip upside down. / Vänd kastrullen upp och ner.

12. Serve with yogurt. / Servera med yoghurt.

13. Done! / Klart!

IMG_5794IMG_5825IMG_5797IMG_5820


3 Ingredient Chocolate Truffles – Chokladtryfflar på 3 ingredienser

IMG_5872

Ok… i don’t know if I’m the only one guilty of being stuck at these tasty videos on Facebook, where everything they make look delicious (it’s seldom healthy, and seldom holds nutritional value, but still). Last week I didn’t only look, but I actually MADE two of the recipes that I had seen, and the first one was these delicious 3 ingredient chocolate truffles. I wouldn’t call them truffle truffles, but they were really delicious. In the original video they used chocolate sprinkles, which I exchanged for coconut! Try it out!

Recipe / Recept 

1 jar of condensed milk / 1 burk kondenserad mjölk 

40 g of butter / 40 g smör 

2/3 cups of cacao powder / 1.6 dl kakao 

unsweetened coconut flakes / osötad kokos

1. Melt the butter in a pot. / Smält smöret i en kastrull.

2. Add the condensed milk and the cacao powder. / Lägg i den kondenserade mjölken och kakaon.

3. Let simmer while stirring for about 8-10 min, or until the batter loosens from the sides of the pot. / Låt puttra medan du rör i ca 8-10 min, eller tills smeten lossnar från kanterna av kastrullen.

4. Butter a plate and pour on the chocolate batter. / Smöra en tallrik och häll på smeten.

5. Let cool in the fridge for about 1.5 h. / Låt svalna i kylen i ca 1.5 timmar.

6. Roll small balls and coat in coconut or sprinkles. / Rulla små bollar och täck i kokos eller strössel.

7. Done! / Klart!

IMG_5838IMG_5846IMG_5854IMG_5866

Banana & Chocolate Cheesecake – Banan & Choklad Cheesecake

IMG_5736

I don’t make a lot of cheesecakes, mostly because of my own impatience, and the slightly longer cooking times. Although, my friend Samantha made a cheesecake a couple of weekends ago, and I got inspired (because it was so good) to make one as well! I altered the recipe slightly by adding one egg since I don’t bake with corn starch. I added some chocolate powder to the crust, and banana to the filling, and it came out to be delicious! Try it yourself!

Recipe / Recept 

1.5 cups of crushed graham crackers / 6.25 dl smulor av grahams kex 

1 stick of butter / 113 g smör 

2 tbsp of cocoa powder / 2 msk kakao

1 tbsp of sugar + 0.8 cups / 1 msk socker + 2 dl

2 pounds of cream cheese / 900 g cream cheese

3 eggs / 3 ägg

1 tsp vanilla / 1 tsk vaniljsocker 

1 cup of light sour cream / 2.5 dl lätt creme fraiche 

2 bananas / 2 bananer 

1. Start by pre heating the oven to 450F. / Sätt ugnen på 250 grader.

2. Melt the butter and mix with the cookie crumbles as well as the cacao powder and 1 tbsp sugar. / Smält smöret och blanda med kaksmulorna, kakaon och socker.

3. Press out in a round baking pan. / Tryck ut i en rund spring form.

4. Let chill in freezer. / Låt kylas i frysen.

5. Mix sugar, eggs, sour cream, vanilla and cream cheese together. / Vispa ihop socker, ägg, creme fraiche, vaniljsocker och cream cheese.

6. Set aside one third of the batter. / Lägg en tredjedel av smeten i en annan skål.

7. Whisk in the two bananas in the bigger batter. / Vispa i två bananer i den större smeten.

8. Spread the banana batter on top of the crust, and the plain batter on top of the banana batter. / Bred på banansmeten på botten, och den vanliga smeten på banan smeten.

9. Bake for 10 min, then decrease the heat to 200 F and bake for 50 more min. / Grädda i 10 min, sänk värmen till 90 eller 100 grader och grädda ytterligare 50/45 min.

10. Take out and let cool. / Ta ut och låt svalna.

11. Keep in the fridge. / Låt stå i kylen.

12. Done! / Klart!

IMG_5742IMG_5762IMG_5756IMG_5751IMG_5776

Raspberry Caves – Hallongrottor

IMG_5704

This is the Swedish version of a snickerdoodle, or similar, childhood cookie that your grandma would offer you when you went over for coffee in the afternoon. They are quite similar to regular thumbprint cookies, but they are larger and the dough contains a little bit of baking powder. They are very easy to make, and super cute to have around!

Recipe / Recept

1.8 cups of flour / 4.5 dl mjöl

0.35 cups of sugar / 0.75 dl socker

200 g butter / 200 g smör

1 tsp baking powder / 1 tsk bakpulver

1 tsp vanilla / 1 tsk vaniljsocker

raspberry jam / hallonsylt

1.Preheat the oven to 400 F. / Sätt ugnen på 200 grader.

2. In a blender, mix all ingredients except jam until a dough is formed. / I en mixer, mixa alla ingredienser utom sylten tills det blivit en deg.

3. Roll small balls and press out in a muffin thin. / Rulla bollar och tryck ut i en muffin form.

4. Create a cave in the middle with your thumb. / Skapa en grotta i mitten med hjälp av din tumme.

5. Fill the hole with jam. / Fyll hålet med sylt.

6. Bake for about 12 min, or until golden on top. / Grädda i ca 12 min, eller tills gyllene på toppen.

7. Done! / Klart!

P.S Stays well in the freezer. / P.S Förvaras väl i frysen.

IMG_5700IMG_5702IMG_5706IMG_5711IMG_5723IMG_5717IMG_5728


Gluten Free Blood Orange, Almond & Ricotta Upside Down Cake – Glutenfri Blodapelsin, Mandel & Ricotta Upp & Ner Kaka

IMG_5588

Ok, I saw this cake on buzz feed originally, and I was mesmerized.I ended up using the smitten kitchen recipe instead, since I know that the recipes are usually really good! The only thing I changed was that I used 3 small blood oranges instead of 2, plus 1 whole for the layering.  I’ve never made an upside down cake before, so I was a little scared of as how it would turn out. I had been warned from other blog commenters that it could be very hard. BUT, I made it! The cake came out perfect, and is so crazy moist! My only caution would be that it is very sweet – so would be perfect to serve with greek yoghurt or sour cream or something like that to balance it out. Otherwise, ready, set, bake!

Recipe / Recept 

1/2 cup brown sugar / 1.25 dl muscovado socker 
1 tablespoon water / 1 msk vatten
3 large eggs, separated / 3 ägg, delade i gula och vita
2/3 cup granulated sugar / 1.35 dl socker
3 + 1 small blood oranges, or another orange of your choice / 3 + 1 små blodapelsiner
1/2 cup butter, softened / 115 g smör
2/3 cup (165 grams) ricotta / 1 2/3 dl ricotta
1/3 cup cornmeal / 0.8 dl majsmjöl
1 cup almond flour or meal / 2.5 dl mandelmjöl 
1/2 teaspoon salt / 1/2 tsk salt

1.Start by cutting out parchment paper to line the baking mold. / Börja med att klippa ut bakplåtspapper som täcker botten av formen.

2. Butter the bottom and cover with the paper. / Smöra botten och lägg på pappret.

3. Mix brown sugar with water and spread on the parchment paper. / Blanda brunt socker och vatten och täck bakplåts pappret.

4. Heat the oven to 300 F. / Sätt ugnen på 150 grader.

5. In a bowl, grate the zest of the 2 oranges and mix with the white sugar. / I en skål, riv skal från två av apelsinerna och blanda tillsammans med sockret.

6. Separate the eggs and whisk the egg whites until fluffy and hard. / Separera äggen och vispa äggvitorna till ett hårt skum.

7. Add butter to the sugar and zest and mix until soft. / Blanda i smöret i sockret och vispa tills de blivit mjukt.

9. Add the egg yolks in, one at a time. / Blanda i äggulorna, en åt gången.

10. Add the juice from 3 oranges and ricotta, mix. / Blanda i saften från 3 apelsiner och ricotta.

11. Add in the flours. / Blanda i mjölen.

12. Carefully fold in the egg white foam, just until it’s mixed with the rest of the batter. / Vik försiktigt in skummet från äggvitorna, rör bara tills de precis är blandat.

13. Cut the last orange in slices ad thin as you can, and add on top of the brown sugar and water in the pan. / Skiva den sista apelsinen så tunt du kan, och lägg i botten av formen.

14. Carefully put the batter on top. / Lägg försiktigt på smeten.

15. Bake for about 45 min (mine took 50) but check with a toothpick and when it comes out dry, bake for another 5 min (the cake is still soo moist). / Grädda i ca 45 min (min tog 50) och kolla med en tandpetare om den kommer ut torrt. Grädda ytterligare 5 min efter (den blir fortfarande sjukt saftig!).

16. After it’s been out for 5 min, turn it upside down. / När den varit ute ur ugnen 5 min, vänd den upp och ner.

17. Let cool. / Låt svalna.

18. Done! / Klart!

IMG_5559IMG_5578IMG_5597IMG_5580IMG_5579IMG_5590